NOTE: this article is created by Techsoup tech. It is very helpful. So I note small references only for the Windows server part.
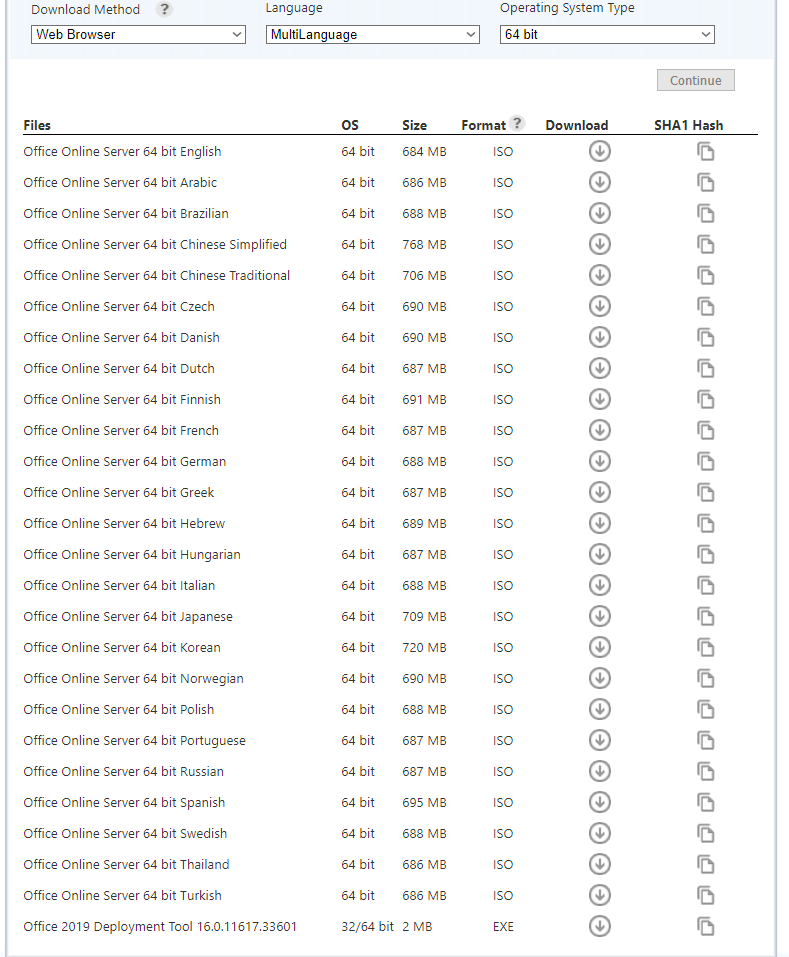
When you are downloading the software from VLSC page, you might find 2 types of installation. Office Online Server 64 bit for multi-languages, and note the last one is the deployment tool. The deployment tool is the only one you need to install, do NOT install office online server 64 bit if you are not planning to do for this server just once, because if you installed the Office Online Server, the deployment tool will not work, and you would have to uninstall OOS in order to use the deployment tool.
Here are the things you need before you get started:
- an internet connection,
- to be running Windows server 2019,
- administrator account password for your windows server (Ideally, you should be logged into an administrator account for your installation),
- licence activation key or your organization’s VLSC account credentials so that you can get your activation key.
– If you have not yet created a VLSC account, please see our How to set up a VLSC account guide. For more help, see Step 5.
Outline
- Prepare your computer
- Download and install the Office Deployment Tool
- Download your configuration file
- Download and install your app through the Windows Command Prompt
- Get your activation key from the VLSC
- Activate your software
- Pin your apps (optional)
Step 1: Prepare your computer
A) Uninstall any previous versions of the Microsoft Software you’re installing.
Note: The installation will not work if the Microsoft App is already installed, regardless of the version.
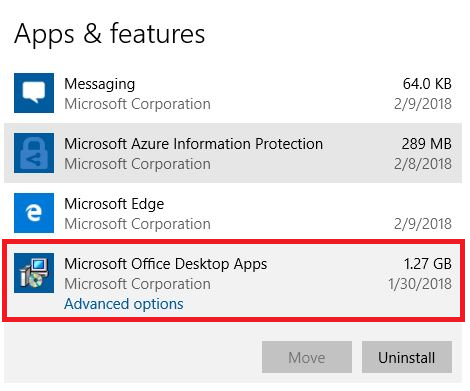
B) IMPORTANT! Check that your computer did not come pre-installed with Office 365.
Many new computers come pre-installed with Office 365. To check:
1. Click on the Start menu. Type “Apps and features” and select the match with the same name. (Note: You cannot get to the required page through the Control Panel).
2. Search the Apps & features list for “Microsoft Office”
3. If the results list “Microsoft Office Desktop Apps” or “Microsoft Office 365” click on the item, and then click “Uninstall”. Otherwise, you can proceed to Step 2.
Step 2: Download and install the Office Deployment Tool
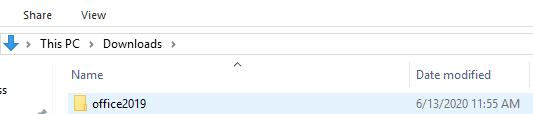
A) Create a new folder on your Desktop. Name it “ODT” or “Office 2019”.
B) Download the Office deployment tool (ODT).
Visit the Microsoft Download Center and click on the Download button.
C) Install the ODT.
Open the file to install it. You will be prompted to accept Microsoft’s Software Licence Terms.
Note: If you are not logged into an administrator account, you will be prompted for an administrator’s password.
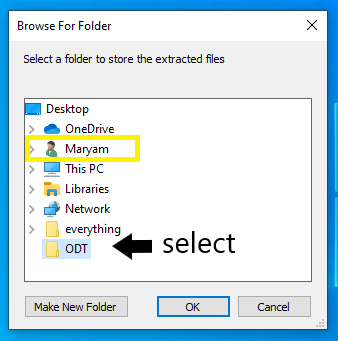
D) Store the extracted files in the right folder.
You will be prompted to select a folder to store the extracted files. Make sure your username is indicated in the dialogue box.
Using a non-administrator account?

[ + ] If you don’t see your username in the dialogue box, click to expand
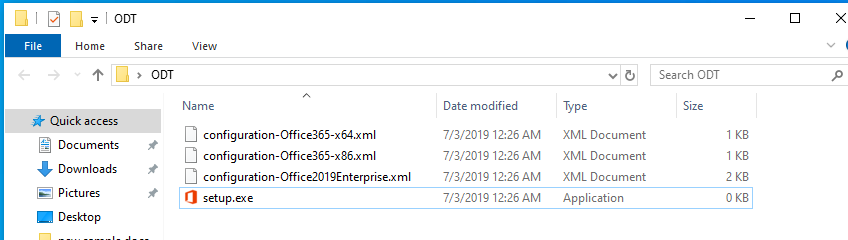
Store extracted files from the Office Deployment Tool in the new “ODT” folder in your Desktop. This is the folder we created in Step 2 Part A.
If you opened your ODT folder on your desktop, it should look like the image below:
Step 3: Download your configuration file
[ + ] Click to learn more about XML files
[ ‒ ] Close
A) Select the right XML file for your software.
The XML files are available below section B. Click on the name of the software you want to install to access the version and language you need.
Tip: Are you unsure if your computer is 64 bit or 32 bit? You can go ahead and download the 32 bit version. If you are installing multiple Microsoft 2019 products, make sure you install the same version for all products.
B) Download the XML file.
When you click on a link under the product titles below, you will be taken to a file hosted in box. Download the file by clicking on Download near the top right corner of the Window.
<Configuration>
<Add OfficeClientEdition=”64″ Channel=”PerpetualVL2019″>
<Product ID=”Standard2019Volume”>
<Language ID=”en-us” />
</Product>
</Add>
<Display Level=”Full” AcceptEULA=”TRUE” />
</Configuration>
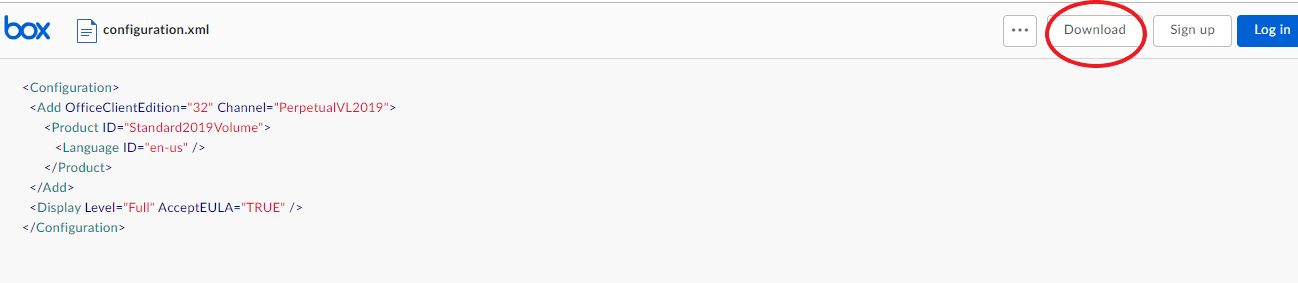
A dialogue box may appear after a few seconds. Save the file.
Office Standard 2019 [ + ]
English:
French:
[ ‒ ] Close
Office Professional Plus 2019 [ + ]
[ ‒ ] Close
Access 2019 [ + ]
[ ‒ ] Close
Project Standard 2019 [ + ]
[ ‒ ] Close
Project Professional 2019 [ + ]
[ ‒ ] Close
Visio Standard 2019 [ + ]
[ ‒ ] Close
Visio Professional 2019 [ + ]
[ ‒ ] Close
C) Move the XML file to the “ODT” Folder.
Move the XML file from your Downloads folder to your new “ODT” Folder in your Desktop. This is the folder we created in Step 2 Part A.
If you opened your ODT folder, it should like the image below:
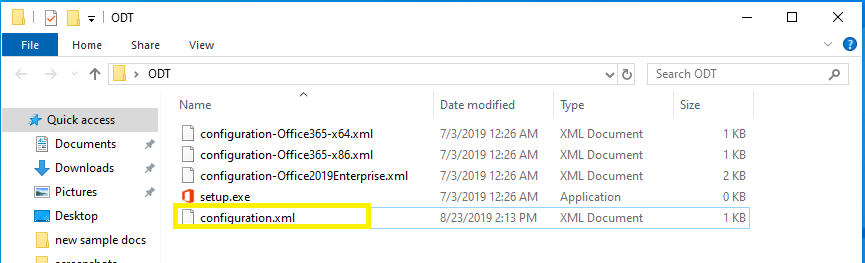
IMPORTANT! Your file name must either be displaying as “configuration.xml” or “configuration”. Variations in the file name will cause issues in Step 4C.
Step 4: Download and install your app through the ‘Windows Command Prompt’ application
[ + ] Click to learn more about Windows Command Prompt
[ ‒ ] Close
A) Open Windows Command Prompt.
Open Windows Command Prompt by clicking on the Start button and typing cmd. Open the application.
The command prompt will show your version of Windows and copyright information in the first 2 lines.
The next line will show you your current working directory, it should say something like “C:\Users\username”. This is called your home directory.
B) Change your current directory to the ODT folder on your desktop.
[ + ] Click to learn more about the cd command
[ ‒ ] Close
1. Copy the command below:
cd Desktop\ODT
2. Paste this command by right-clicking in the command prompt
3. Hit Enter on your keyboard to execute the command. This should change your current working directory to the ODT folder in your Desktop.
Troubleshooting:
“The system cannot find the path specified”
[ + ]Click for troubleshooting help
[ – ] Close
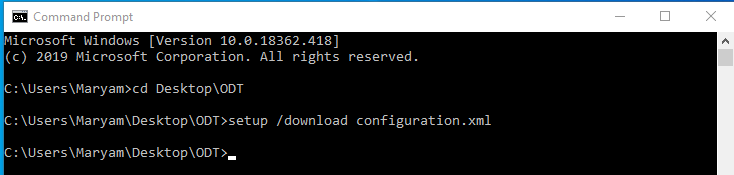
C) Download your Microsoft 2019 Apps.
Copy and paste the command below:
setup /download configuration.xml
Hit Enter .
![Command prompt window. The last line reads C:\Users\Maryam\Desktop\ODT[greater than symbol]setup /download configuration.xml](https://lh6.googleusercontent.com/mI_K_0R3KSJtoJ5BuWRstJ4LBIlRe4x2Zzoti7HjOuHa_d3IG-QN8GRYIe1KGCZS11PXUSWlULL_97RwlesZFeZ4CfN8oVoof_RWrLk_gryV4dsGttbAt-1maHo6vwHWtm4BGZnj)
This command can take around 10 minutes to finish running. It will seem as though nothing is happening, but files are being downloaded to your ODT folder.
Troubleshooting:
“Couldn’t install”
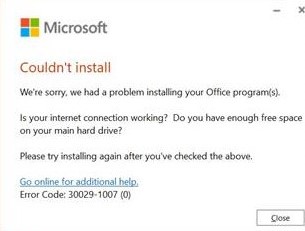
[ + ]Click for troubleshooting help
[ – ] Close
If you opened your ODT folder, it should look like the image below:

You will know the command has finished running when the Command Prompt window looks like this:
There is a new line starting with C:\Users\username where you did not enter a command.
D) Install your Microsoft 2019 Apps.
Once the previous command has finished running you must copy and paste, the command below:
setup /configure configuration.xml
Hit Enter.
You will be prompted to allow Microsoft to make changes to your device.
Once you agree, a display window will appear, showing the progress of your installation.

When the installation is complete, the display will disappear. You can then close the command prompt.
Step 5: Get your activation key from the VLSC
In this step, you will log onto the Microsoft Volume Licensing Service Center (VLSC) to retrieve your activation key.
A) Login to the VLSC.
Go to the Volume Licensing Service Center and log in with the email listed on your TechSoup Account for Software Delivery.
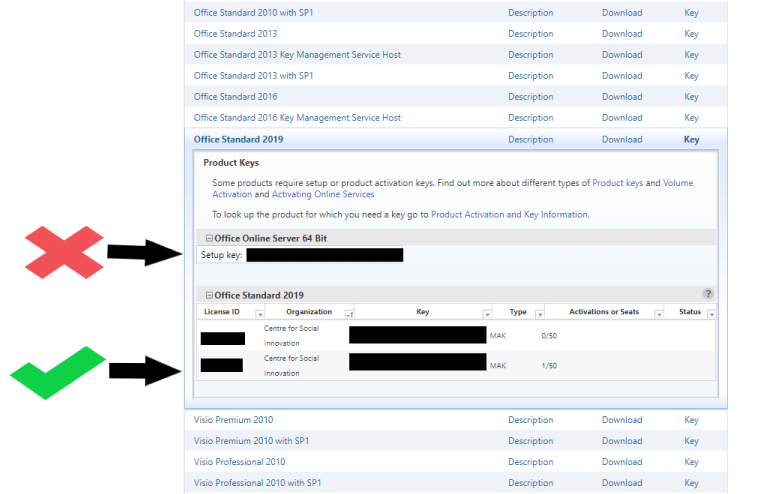
B) Retrieve your installation key.
1. Go to the Downloads and Keys tab. Find the Microsoft 2019 app you are installing in your list of products.
2. Click on the Key tab beside the product you want to install. Copy the MAK key in the bottom table.
The image below shows the right and wrong keys. Your most recent key is the one with the biggest licence ID number.
Note: Do not copy the key under the “Office online Server 64 Bit” heading called “Setup Key” at the top.
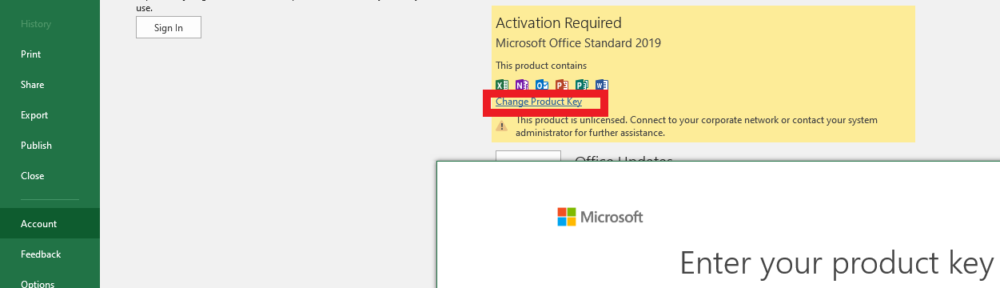
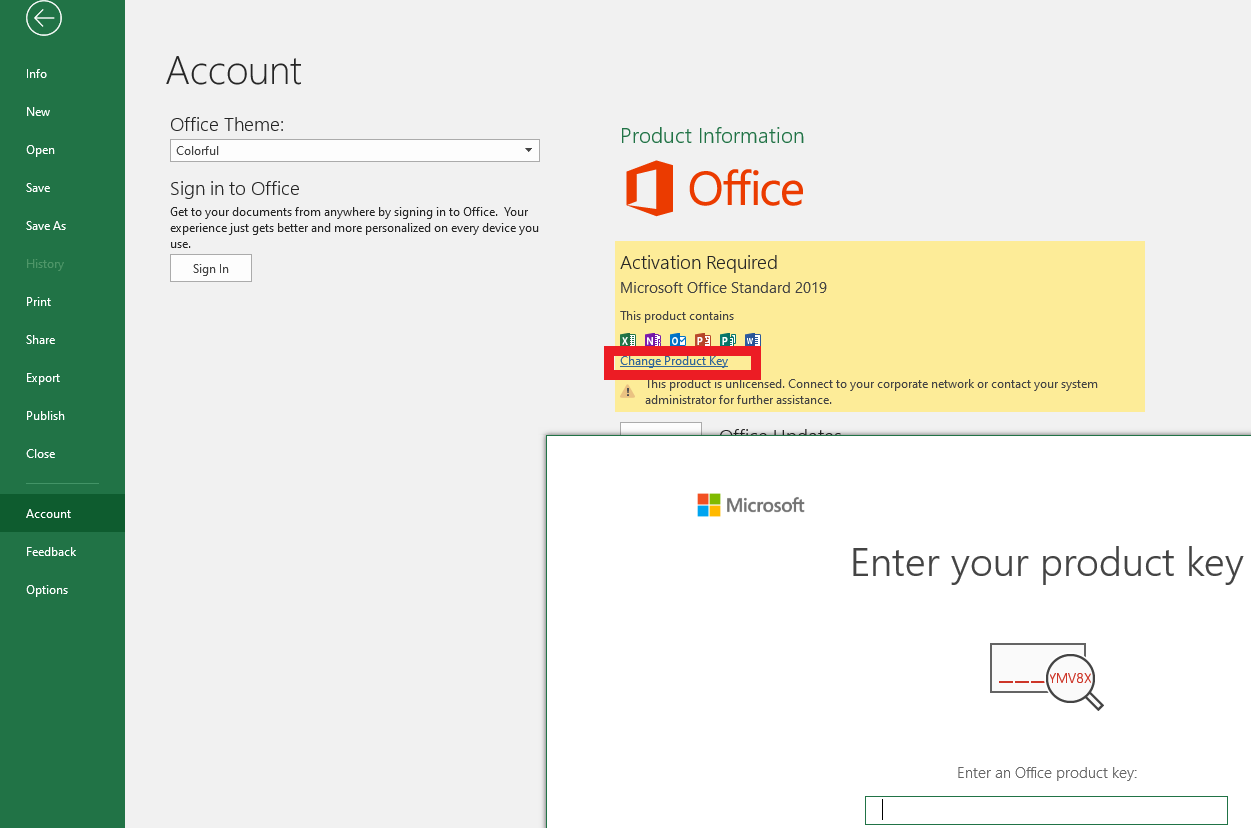
Step 6: Activate your software
A)Open an Office application.
Once you have copied the correct key, open one of your new Microsoft applications. We opened Microsoft Excel.
B)Enter the Activation Key.
1. Open a blank document.
2. Go to File > Account > Change Product Key and paste your activation Key. Activate your software.
Step 7: Pin your apps (optional)
Microsoft 2019 apps won’t create shortcuts for your desktop.
To make them easy to access, click on your Start Menu, and go down your list of programs to locate the Microsoft Office Apps.
When you come across the ones you wish to pin, right click on the app, and then click Pin to Start.

The programs to pin for Office Standard 2019 are:
| ExcelOneNote 2016Outlook | PowerPointPublisherWord |
The programs to pin for Office Pro Plus 2019 are:
| AccessExcelOneNote 2016Outlook |